
Community Stargazers Telescope Guide
———————————————————
Welcome to the Community Stargazers Telescope Guide — your friendly companion for the exciting journey into amateur astronomy. Whether you have just purchased your very first telescope or are still deciding which design suits you best, this guide is here to help. Below, you will find clear, jargon-free descriptions of the six most common telescope types used by beginners and experienced observers alike, along with honest pros and cons for each design, a quick-comparison reference chart, and practical tips to get you observing confidently under the stars.
Introduction
Telescope Fundamentals and Definitions
All telescopes work by gathering light and focusing it to produce a magnified image, but they do so through three fundamentally different optical designs: Refractors use a series of glass lenses to bend and focus incoming light. Reflectors use a curved mirror to collect and reflect light to an eyepiece. Catadioptric (compound) designs cleverly combine both lenses and parabolic mirrors in a compact folded optical path, offering versatility in a portable package.
Beyond design, three factors dominate a telescope's performance. Aperture — the diameter of the main lens or mirror — determines how much light is gathered; bigger aperture means brighter, more detailed views. Focal length, usually printed right on the telescope, determines magnification potential and the field of view. Mount type — either a simple altitude-azimuth mount or a more precise equatorial mount — governs how easily you can track objects as they drift across the sky. Another term beginners will hear and read is focal ratio (also known as f/ratio). Focal ratio is the focal length divided by the aperture in millimeters. A lower f/number, like f/4 - f/6 produces a wider and brighter field of view which is great for seeing large galaxies and nebula. A higher f/number, like f/10 - f/15 provides a narrower high magnification view, which is perfect for lunar craters and planets.
Telescope tripods and mounts are just as important as the optical instruments. A flimsy/shaky mount will ruin a viewing experience. Investing in an appropriate mount for the telescope is vital. Aside from payload capacity, as noted above, mounts can be generally differentiated between altazimuth (alt-az) mounts and equatorial mounts. Alt-az mounts move up/down (altitude) and left/right (azimuth). They are highly intuitive and generally best for beginners. Equatorial mounts are tilted and align with the earth’s axis. Once set up they move smoothly and make tracking objects easier. Equatorial mounts require a bit more time to set up and can be daunting for beginners but are pretty much essential for serious astrophotography. Some telescopes also come with computerized Go-To technology, allowing users to input various pieces of data and thereby enabling the telescope to effortlessly slew (move) to hundreds or thousands of preprogramed objects.
Telescope eyepieces magnify the image. While many specialty eyepieces exist, including, among others zoom lenses, the typical range will be from 6 millimeters (mm) to 25 or 40 mm. Perhaps counterintuitively, a 40mm eyepiece is low power, providing a wide field of view. It can be great for finding objects or getting “the big picture.” A 25mm eyepiece has slightly more magnification. This will frequently be the eyepiece most often used. Generally, starter kits come with a 25mm eyepiece for a reason. A 15mm eyepiece is considered medium power. It is great for seeing star clusters, galaxies, and general observing. A 10mm eyepiece is medium-high power. It is fantastic for lunar detail and bright planets. A 6mm eyepiece is considered high power. These can be great for planetary detail and double stars.
To determine magnification, you take the telescope’s focal length and divide it by the eyepiece magnification. For example, suppose you had a telescope with a 1200mm focal length, such as an 8-inch Dobsonian, and put in a 25mm eyepiece. 1200 / 25 = 48x magnification. If you used a 6mm eyepiece, you would have 1200/ 6 = 200x magnification. You can also double or even triple the magnification by using something called a barlow lens. A 2x barlow doubles the magnification; a 3x barlow triples it.
Importantly, there are limits to how much you can magnify an image. Among other things, aperture creates detail, magnification just enlarges it. For a general rule of thumb, 40X per inch of aperture is a realistic maximum, while 50x per inch of aperture is the theoretical limit for magnification. If we use the 8-inch Dobsonian example, the realistic maximum magnification is 40 × 8, or about 320 x. The theoretical maximum magnification is 50 × 8, or about 400x. Using the numbers above, if we put a 6mm eyepiece with a 2x barlow lense into the 8-inch dob, we would be at that 400x magnification. With anything less than crystal clear seeing conditions the image would most likely be blurry. I can count on one hand the number of times I’ve been able to exceed the realistic maximum magnification, and the theoretical maximum only once!
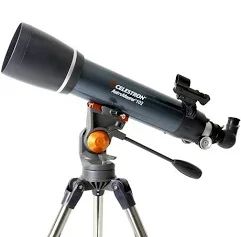
Refractor Telescope
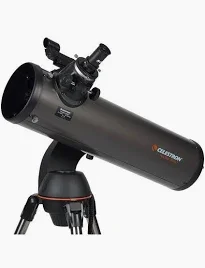
Reflector Telescope
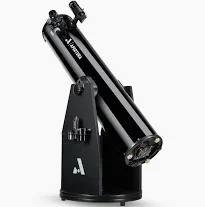
Dobsonian-Style Reflector Telescope
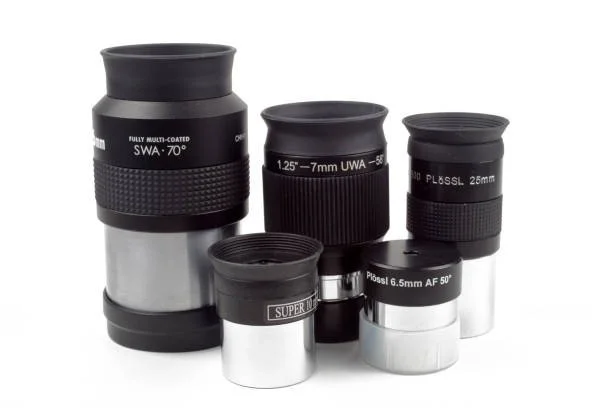
Eyepieces
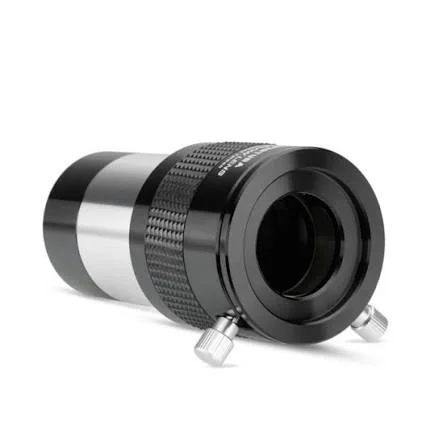
2x Barlow Lens
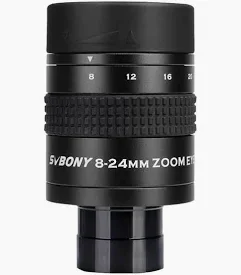
8-24mm zoom lens
Types of Telescopes
Refractor Telescopes
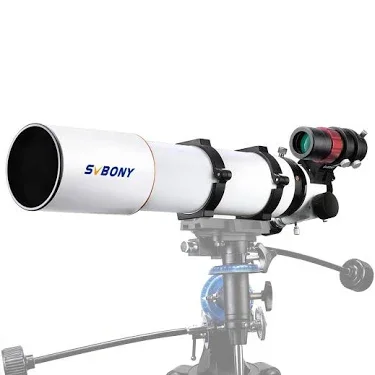
Svbony 503 102ED
The refractor is the telescope most people picture when they first think of stargazing. Using a large objective lens at the front of a sealed tube, light is bent (refracted) as it passes through the glass and is brought to a sharp focus at the eyepiece end. The result is a crisp, high-contrast image with excellent color rendition — particularly stunning on the Moon, planets, and bright double stars where fine detail is prized above all else.
Because the optical tube is sealed, refractors are essentially maintenance-free. There are no mirrors to cool down, no optical alignment (collimation) required, and no open tube to collect dust and dew onto sensitive optical surfaces. A quality refractor with an apochromatic (APO) objective lens eliminates the false color fringing that once plagued cheaper achromatic designs, though APO models come at a higher price.
Refractors are ideal first telescopes for beginners who want reliable, grab-and-go performance. A 70–102 mm refractor on a sturdy alt-az or equatorial mount will reveal breathtaking detail on the lunar surface, Saturn's rings, Jupiter's cloud bands, and the phases of Venus. While they lack the raw light-gathering power of large reflectors, their ease of use and durability make them a perennial favorite.
✓ Pros
+Durable, low maintenance, grab & go
+Lightweight and very portable
+No collimation — fully sealed optical tube
+Excellent high-contrast views of planets & Moon
+Great for daytime terrestrial viewing too
✗ Cons
–Smaller aperture per dollar vs. reflectors
–Expensive per inch of aperture
–Chromatic aberration on cheaper models
–Limited aperture compared to reflectors at same price
–Longer tube can be awkward to store and transport
Best For: Lunar and planetary observing, double stars, terrestrial daytime use
Price Range: $100 – $2,000+
Recommended Starter Models: Svbony 503 80ED or 102ED, Celestron AstroMaster 70-102AZ
Recommended Aperture: 70mm – 100mm for beginners
Reflector Telescopes
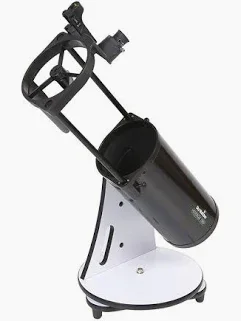
Sky-Watcher Heritage 150P
The reflector telescope, sometimes called a Newtonian reflector, was conceived by Sir Isaac Newton in 1668. It collects light using a large parabolic primary mirror at the bottom of an open tube. That light travels up the tube, reflects off the primary mirror, and is directed by a small flat secondary mirror into an eyepiece mounted at the side near the top of the tube. This elegant design eliminates the chromatic aberration inherent in lenses, producing naturally color-free images across the entire field of view.
For any given budget, a Newtonian reflector offers more aperture than any other design — and aperture is the single most important factor for viewing faint deep-sky objects such as nebulae, star clusters, and distant galaxies. A 6-inch (150 mm) Newtonian will reveal structure in the Orion Nebula, resolve the Andromeda Galaxy, and separate hundreds of double stars with ease. The open-tube design does mean that mirrors need occasional cleaning and realignment (collimation), but this is a straightforward task that most beginners learn quickly.
Newtonians pair well with both alt-az and equatorial mounts and are available in a huge range of sizes and price points. For those on a budget who want maximum aperture for the money — particularly for visual deep-sky observing — a Newtonian reflector is frequently the best choice available.
✓ Pros
+Best aperture-per-dollar of any telescope type
+No chromatic aberration — color-free images
+Excellent for nebulae, galaxies, and clusters
+Widely available, huge community support
✗ Cons
–Requires occasional collimation (mirror alignment)
–Open tube collects dust and dew
–Mirror needs time to cool to outdoor temperature
–Eyepiece position can be awkward at some orientations
Best For: Galaxies, nebulae, star clusters, entry-level astrophotography
Price Range: $150 – $1,500
Recommended Starter Models: Sky-Watcher Heritage 130P or 150P • Celestron NexStar 130SLT • Celestron StarSense Explorer 114AZ
Dobsonian Telescopes
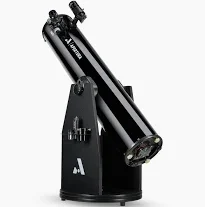
Apertura 8-Inch Dobsonian
While a type of Newtonian reflector, the Dobsonian deserves special mention because it is so widely used by amateur astronomers. It is essentially a Newtonian reflector mounted on an ingeniously simple rocker-box alt-azimuth base — a design pioneered by amateur astronomer John Dobson in the 1960s with the explicit goal of giving observers the largest possible mirror at the lowest possible cost. Dobson wanted to bring the universe to the public, and he succeeded brilliantly. Interestingly, Dobson never sought to paten his design. He viewed his innovation as a gift to astronomy.
A Dobsonian is operated by simply pushing the tube in any direction — up, down, left, right — making it the most intuitive telescope to use for beginners. For pure deep-sky visual observing, nothing matches the aperture-for-dollar ratio of a Dobsonian. An 8-inch Dobsonian reveals thousands of galaxies, nebulae, and star clusters that smaller scopes cannot resolve. The trade-off is size and weight, and the lack of motorized tracking.
✓ Pros
+Best aperture-per-dollar of any telescope type
+Stable, sturdy rocker-box platform
+No chromatic aberration — color-free images
+Excellent for nebulae, galaxies, and clusters
+Simple, intuitive push-to operation
+Widely available, huge community support
✗ Cons
–Large and heavy — not easily portable
–Requires occasional collimation (mirror alignment)
–Open tube collects dust and dew
–Mirror needs time to cool to outdoor temperature
–Manual tracking only (unless motorized upgrade added)
–Eyepiece position can be awkward at some orientations
–Requires dark skies to fully exploit large aperture
Best For: Deep-sky visual observing, Messier objects, galaxies, nebula, and star clusters
Can include Go-To technology, though more expensive and a steeper learning curve
Price Range: $300 – $2,500
Recommended Starter Models: Apertura 6” or 8” Dobsonian • Sky-Watcher 6” or 8" Dobsonian
Compound or Catadioptric Telescopes
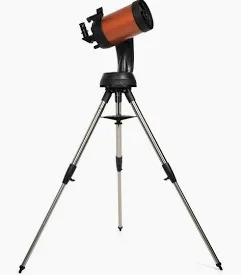
Celestron NexStar 6” Schmidt-Cassegrain
Best For: All-round observing, astrophotography, planetary detail
Price Range: $400 – $5,000+
Recommended Starter Models: Celestron NexStar 6SE • Celestron NexStar 8SE
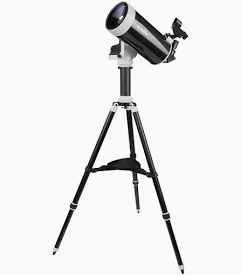
Best For: Moon, planets, double stars, grab-and-go observing
Price Range: $300 – $2,500
Recommended Starter Models: Sky-Watcher Skymax 102 or 127 • Explore Scientific First Light 100 mm
Sky-Watcher 127 mm Maksutov-Cassegrain
Some telescopes combine both lenses and mirrors into one powerhouse telescope design. The Schmidt-Cassigrain and Maksutov Cassigrain telescopes are able to get incredibly long focal lengths into compact tubes. They essentially reflect and fold the light coming into the front of the telescope before directing it to the eyepiece.
The Schmidt-Cassegrain Telescope (SCT) is the most popular compound telescope design among intermediate and advanced amateur astronomers. It uses a thin Schmidt corrector plate at the front of the tube to direct light onto a spherical primary mirror; the light then reflects back to a convex secondary mirror mounted on the corrector plate, and is finally directed through a hole in the primary mirror to an eyepiece at the rear. This folded optical path crams a very long focal length into a compact, manageable tube — an 8-inch SCT has a focal length of around 2,000 mm, yet the tube is only about 17 inches long.
This compactness and versatility is the SCT's greatest strength. It performs impressively on planets, the Moon, and double stars, yet has enough aperture for deep-sky objects. Its rear-cell focuser design also makes it straightforward to attach cameras for astrophotography. Most SCTs are sold paired with Go-To computerized mounts that can automatically locate and track thousands of objects at the press of a button — an enormous convenience for time-limited observers.
The SCT is not the cheapest option and benefits from a thorough cool-down period before viewing, as the closed corrector plate slows thermal equilibration. Occasional mirror shift (image movement when focusing) can be a minor annoyance, though quality models minimize this with mirror locks. For the astronomer who wants one telescope to do it all — visual, planetary, and photographic — the SCT is hard to beat.
✓ Pros
+Compact for its long focal length — very portable
+Highly versatile: planets, deep sky, astrophotography
+Often sold with Go-To computerized mounts
+Sealed optics — protected from dust
✗ Cons
–More expensive than equivalent-aperture reflectors
–Needs lengthy cool-down time before optimal viewing
–Mirror shift when focusing (varies by model)
–Corrector plate can dew up in humid conditions
The Maksutov-Cassegrain (often simply called a "Mak") shares the folded optical layout of the SCT but replaces the thin Schmidt corrector plate with a thick, deeply curved meniscus lens — a design pioneered by Soviet optician Dmitri Maksutov in 1941. This meniscus corrector is easier to manufacture to high precision than the Schmidt plate and introduces very little scattered light, resulting in images of exceptional sharpness and contrast that rival those of premium apochromatic refractors at a fraction of the cost.
The Mak's optical strengths make it a celebrated planetary telescope. On nights of steady seeing, a 90–150 mm Mak will reveal fine detail on Jupiter's cloud belts and Great Red Spot, Saturn's Cassini Division, the polar caps of Mars, and the delicate gradations of the lunar surface. The fully sealed tube means the Mak requires zero collimation — the optics are factory-set and remain aligned indefinitely. This makes it an excellent low-maintenance, high-performance choice for beginners focused on the solar system.
The Mak's slower focal ratio (typically f/12 to f/15) means wide-field deep-sky imaging is not its strong suit; it is better suited to high-magnification planetary work. Cool-down time is also longer than an SCT because the thick glass meniscus retains heat. Smaller Maks (90–102 mm) pair beautifully with light tabletop or Go-to alt-azimuth mounts for completely portable use, making them one of the most travel-friendly telescope options available.
✓ Pros
+Superb sharpness and contrast for planetary viewing
+Fully sealed — zero collimation required, ever
+Compact and portable, especially at smaller apertures
+Excellent value for planetary performance
✗ Cons
–Slow focal ratio — not ideal for wide-field imaging
–Long cool-down time due to thick corrector
–Limited aperture ceiling compared to SCTs
–Deep-sky performance limited by smaller aperture models
Smart Telescopes
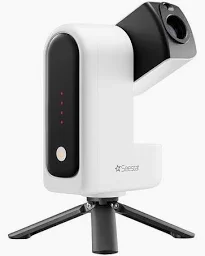
Seestar S30 Pro
Smart telescopes are a revolutionary new category of all-in-one astronomical instruments that emerged in the early 2020s. Products such as the ZWO Seestar S30 or S50, and the Dwarf Mini integrate a small-aperture telescope, a sensitive CMOS camera sensor, a motorized tracking mount, onboard computer, and Wi-Fi connectivity into a single compact unit. There are no eyepieces to peer through — instead, you control everything from a smartphone or tablet app and view live-stacked color images of deep-sky objects on your screen in real time. On particularly cold nights, you can set up your smart telescope outside and control it from the comfort of your car or living room!
Setting up a smart telescope takes minutes. Point it at the sky, connect your phone, select a target from the in-app catalogue (which may include thousands of galaxies, nebulae, and clusters), and the telescope automatically slews to the target, focuses, and begins stacking multiple exposures to progressively reveal faint detail and color invisible to the naked eye. For members in light-polluted suburban areas, smart telescopes offer a genuine advantage: their onboard image stacking software progressively combines exposures to pull faint objects out of bright skies in ways the human eye cannot match visually. The onboard AI handles "plate-solving (figuring out exactly where the telescope is pointed using star patterns), tracking, and image processing entirely automatically. Even beginners can capture stunning color images of the Andromeda Galaxy or Orion Nebula on their very first night out.
Smart telescopes are not without limitations — aperture is typically modest (30-50mm), meaning they cannot match the raw light-gathering of a large Newtonian Dobsonian for visual work, and the experience is entirely screen-based rather than the traditional eyepiece view many find meditative. However, for beginners who want immediate, impressive results; for those with limited mobility; or for anyone who finds traditional setup daunting, a smart telescope delivers an unmatched experience. They are also exceptional for outreach and to share images on a tablet or via email to family and friends.
✓ Pros
+Zero setup complexity — fully automated Go-To & tracking
+Smartphone app controlled — extremely beginner friendly
+Live stacking produces color deep-sky images on night-one
+Works well in light-polluted suburban skies
+No collimation, no polar alignment, no star charts needed
+Excellent for sharing & social media
+Compact, lightweight, extremely portable
✗ Cons
–No traditional eyepiece — screen-only viewing
–Small aperture limits faint object detection
–Limited aperture vs. manual scopes at the same price
–Requires charged battery / power source and Wi-Fi for connectivity
–Higher cost than traditional scopes of same aperture
–Dependent on app/software updates from manufacturer
Best For: Astrophotography, light-polluted areas, tech-savvy beginners
Price Range: $500 – $3,000
Recommended Models: ZWO Seestar S30 or S30 Pro (~$399 - $699, respectively) • Seestar S50 (~$499 -discontinued June, 2026 but still widely available) • S50 Pro ($999) * Dwarf Labs Dwarf Mini (~$399)
Other smart telescopes can be obtained from Vaonis and Unistellar, though these typically have higher price points.
For a more fixed “observatory” set up, the Celestron Origin Mark II Intelligent Home Observatory is a premium smart telescope option.
Telescope Summary
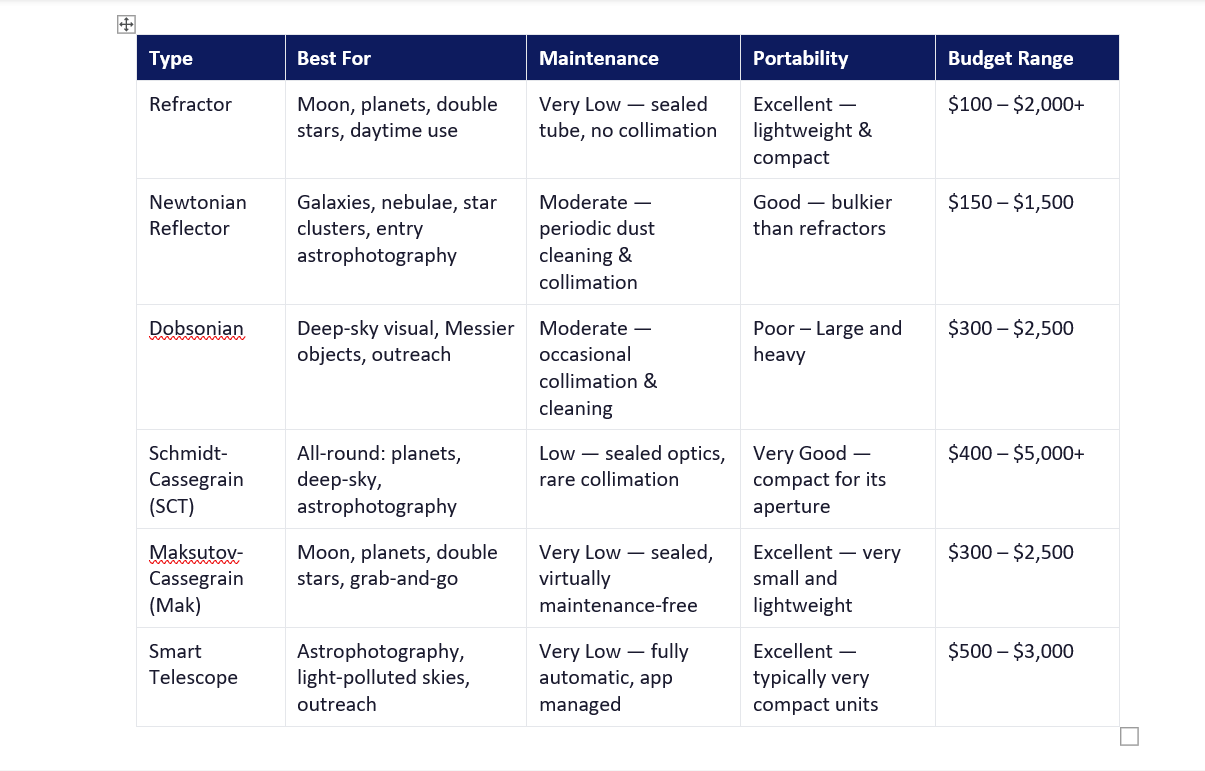
Telescope giant Celestron created a fantastic guide showing how different optical tubes work. It is available here.
Astrophotography
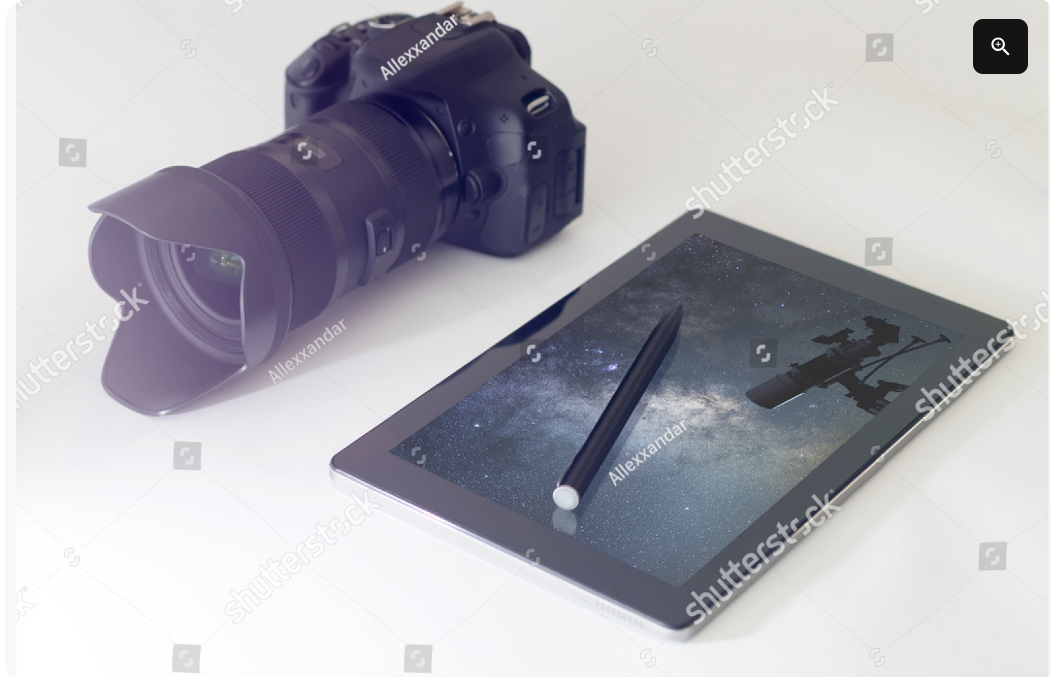
Astrophotography — imaging the night sky through a telescope — ranges from casual Moon snapshots on your phone to deep multi-hour exposures revealing distant nebulae and galaxies. We already discussed the ZWO Seestar line and the Dward Labs models, but there are other options. You do not need to spend a fortune to get started in astrophotography, and there are excellent options for every budget and every telescope type in this guide.
Dedicated Astrophotography Cameras
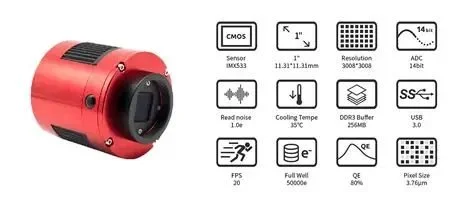
The serious astrophotographer's tool of choice is a dedicated astronomy camera — a cooled CMOS or CCD sensor optimized for capturing faint light with minimal noise during long exposures. Unlike consumer cameras, these sensors connect directly to your telescope's focuser in place of an eyepiece and are controlled by free software on a laptop or mini-PC.
Popular cameras include:
● ZWO ASI series (e.g., ASI 533MC Pro, ASI 2600MC Pro) — industry-standard cameras from entry-level to professional
● Celestron NexImage cameras — affordable planetary imagers
● SVBONY SV305 / SV405 — excellent budget planetary and guiding cameras
● Player One Astronomy — newer brand with outstanding value cooled sensors
Free software options include SharpCap, FireCapture, Ekos/KStars, and Stellarium. Long-exposure deep-sky imaging requires a Go-To equatorial (EQ) mount with autoguiding for precise star tracking.
DSLRs and Mirrorless Cameras at Prime Focus
An entry point many beginners use is attaching a DSLR or mirrorless camera directly to the telescope focuser using a T-ring adapter matched to their camera mount. With the eyepiece removed, the telescope acts as a giant telephoto lens. This technique, called prime focus imaging, captures wide nebula fields beautifully and costs very little beyond a camera you may already own. Results with a fast refractor on an EQ Go-To mount can be stunning.
Smartphone Adapters — Start Imaging Tonight
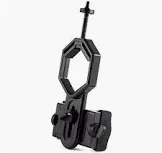
The simplest way to photograph through a telescope is with a universal smartphone adapter — an inexpensive clip-on bracket that aligns your phone's camera lens with any eyepiece. This technique is called afocal photography (or digiscoping), requires no modifications to your telescope, and can produce excellent Moon, Jupiter, Saturn, and Mars photos on your very first night out.
● Works with any standard eyepiece on any telescope
● Adapters from under $15 to $50 from brands including Celestron and Svbony
● Limitations: phone sensors struggle with faint deep-sky objects — for those, a dedicated camera is needed
Tips for New Stargazers
EIGHT ESSENTIAL HABITS FOR BETTER OBSERVING
These tips apply regardless of which telescope you use. Master these habits early and you will enjoy astronomy far more from your very first session.
1. Let your eyes dark-adapt for at least 20 minutes before serious observing. Your eyes contain rod cells that take time to become sensitive to low light. Even a brief exposure to white light resets this process — guard your dark adaptation carefully.
2. Start with the Moon — it is always impressive and very easy to find. The lunar surface rewards even binoculars or a 60mm refractor with breathtaking detail: craters, mountain ranges, rilles, and lava plains. It is the perfect first target for any telescope.
3. Always start with low magnification first (typically a 40 mm or 25mm eyepiece), then increase gradually. Low power gives a wider field of view, making it much easier to center and identify objects before zooming in for detail.
4. Bring a red flashlight (red LED torch) to read your notes or star charts and handle equipment. Red light does not trigger your eyes' light-adapting response, preserving the night vision you worked 20 minutes to build up.
5. Join club nights regularly — peer learning dramatically accelerates your skills. Seeing how experienced members set up, align, and operate different telescopes is worth more than any book or video tutorial. Bring questions!
6. Download Stellarium (free) or SkySafari to help you plan sessions and identify objects. Both apps show a real-time map of the sky for your exact location and time — invaluable for beginners learning to navigate the constellations.
7. Don't chase the highest magnification — aperture and sky conditions matter far more. High magnification amplifies atmospheric turbulence and dim images equally. A steady, well-focused view at moderate power almost always shows more detail than a blurry, shaking image at high power.
8. Keep your eyepieces in a padded case and clean them carefully with appropriate lens tissue or a blower brush — never paper towels or clothing. Eyepieces are precision optical instruments and the single most important upgrade path for any telescope. Telescope lenses should be treated with equal care.
Want more information on types of telescopes? See our Supplemental Resources
Need help choosing the right telescope? Use our telescope selection quiz
Rev. Oct, 2026